
Last weekend i took some time repairing my daily driver. In 2021 i bought a Lenovo L14 Gen 1 as replacement for my old MacBook Air. I bought the Lenovo because of their good reputation in the Linux and Open Source Community, but this may only apply to their old models.
I replace the battery already last year with a cheap one by IPC Computers, which wasnt the best choice. After a bit more that 12 months it only had 70% capacity left.
So because the battery hast to be replace anyway, i could also repaste the cpu and change the bios battery.
But first of all i went on the hunt for a new battery, this time i wanted to buy a genuine one by Lenovo. That came with a surprise. My Latop introduces in May 2020 is EOL and that mean no Battery straight from Lenovo. You can get the original Battery but twice as expensive as last your and you dont knwo how long it is alredy sitting on the sellers shelf.
That would be a good moment to think abour a new Laptop. But thanks to broligarch Silicon Valley AI bastard, buying every piece of memory in advance for non existing AI datacenters thats no option. My Laptop has 32Gigs of Ram and a fast 1TB SSD, so that would be pricey nowadays. Greetings to the Silicon Valley: go to hell. May your bubble pot faster than the average broligarch marriage last!
Enough rage bait. After a bit of asking around in the fediverse i ordere a battery at iFixit. Hopefully they are big enough to delivers decent quality batteries. Getting the bios battery was far easier at last.
Btw Lenovo has great Videos for all steps: https://pcsupport.lenovo.com/de/en/products/laptops-and-netbooks/thinkpad-l-series-laptops/thinkpad-l14-type-20u5-20u6/solutions/ht510453-removal-and-replacement-videos-thinkpad-l14-20u1-20u2-thinkpad-l14-amd-20u5-20u6
First of all you want to deactivate the batterie. Unplug the PSU and search for that in the Bios / Uefi. The Battery gets reactivated once you plug in the PSU again.
The bottom shell can easily be taken off using a screwdriver and a plektron. Also the battery isnt glued in, you only need a screwdriver to take it out.
Than i took off the cooling unit with fan and heatpipes and saw this:
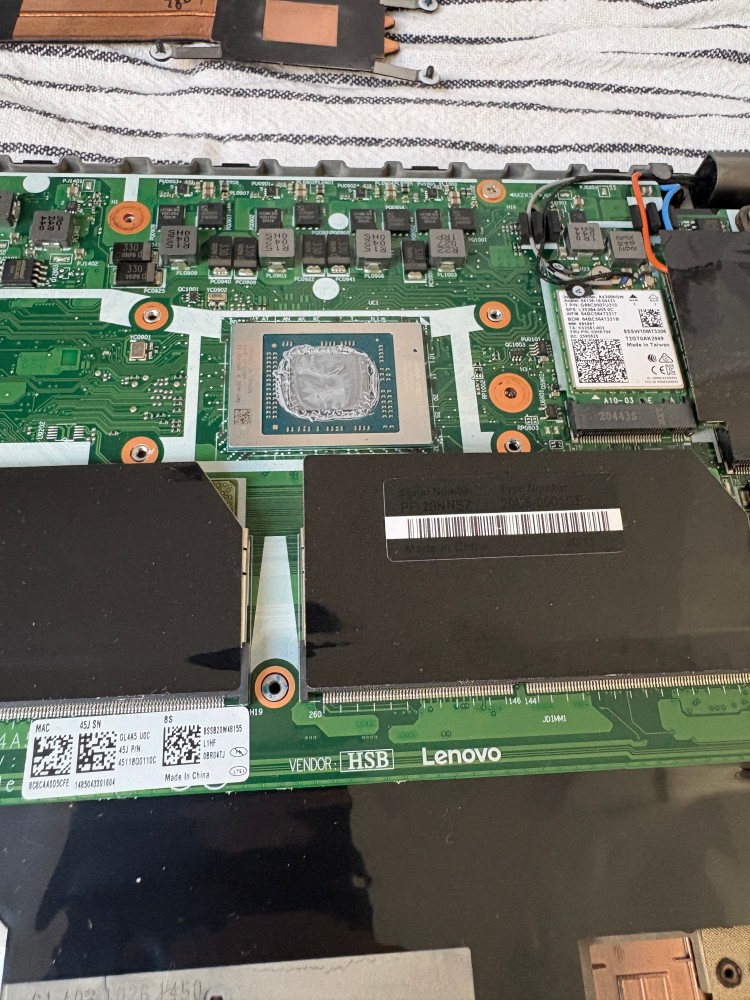
The thermal paste was everywhere, but not were it was supposed to be. So i cleaned everything with cloth, isopropanol and a toothebrush. The stuff was really sticky, but after that i applied some Gelid GC2 which a had lying around, removed the dust from the fan and put everything back together.
Replaced the bios battery, mount the battery and i was ready to put the bottom shell back on.
Now it is really important to calibrate the battery. Fully charge it and leave the charger on the Laptop for two hours more. Now you have to fully discharge the battery. I put everything in the Bios to maximum Performance in Battery mode ans also in the OS. Deactivate everything that could safe power.
After that i got an application i used in the old days while overclocking. Prime95 which is also available as Flatpak. So my Laptop worked till it shutoff itself. While waiting for that i could already see that the thermal paste workd as expected with 10°C less heat at the same workload. In the end you have to charge the battery to 100% again and do not forget to reactivate alle those power saving option you diabled earlier.
So my Laptop is in good shape again. But nevertheless i hope that i can buy a new one some time soon. Those one from Tuxedo computer look really nice.